Showing posts with label projects. Show all posts

Monday, January 27, 2014

Dinghy Lift Revisited

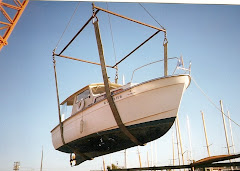
Last summer Jim on Orcas Island installed a dinghy lift on Shatoosh. It still needs some modifications to make it more effective. The upright pole needs to be taller and the lifting arm needs to be longer. Since the whole pole rotates, so does the winch which tends to put the winch handle in an awkward position for letting down the dinghy onto the hardtop.


I have been thinking about solutions to these problems.
1.  Remove arm and make longer one
2.  Lengthen pole by adding a larger diameter piped sleeve over the pre-existing one. This would rotate on the original upright pole and would go down to the brace on the hardtop.
3. Remove winch and place it on the upright pole below the brace. That way it would not rotate and stay fixed.


What would you do? I would love to hear any ideas that you might have.

Monday, July 8, 2013

Securing Pashmina to the Hardtop

This past week I have been tinkering and contemplating a simple way to stow Pashmina on the hardtop. I don't want to put any holes in the hardtop, so this is my first prototype, after talking it over with several people.

I bought some swim noodles, as they are called. Then put  PVC piping down the center of them. An image came to mind as I slowly moved the tube along the piping; it was like working a leg into a tight panty-hose. It would have been good to grease the pipe first, in hind sight. The PVC then would prevent the noodle from being compressed. I still need to run a line through the PVC tubing to tie and secure the  tubing to the grab bars.


Thoughts on the lift and getting Pashmina on to the hardtop. This all started when I first bought Pashmina, a much larger dinghy than I had previously owned. With P1, I could get her up on the hardtop by myself. I always cruised with her on top, rarely, towing her. My mantra was I'd rather "Stow than Tow".

With P2, my mantra changed to I'd rather "Tow than Stow", after P2 got swept away off the swim platform during a storm. She tows really well in rough water so far. If I was to cross a large body of water here in the NW, like the Strait of Juan de Fuca or the Strait of Georgia, then I would have to have her on the hardtop. My friend Jim from Orcas, being the innovative guy that he is, dreaded the thought of me crossing the Strait towing Pashmina and went to work building a lift. While this needs some tweaking still, I am happy to be able to lift her up on the hardtop, especially for stowing during the winter months while under a covered slip. While it is cruising season, I will continue to have her stowed on the swim platform while dock-side and towing her in the water while cruising. She tows really easily and she is easy to get on and off the swim platform. I can rest assured that I have enough options to handle several  situations. When "Mother Nature" kicks up her heels, my other mantra will be,  Don't Stow, Don't Tow, Don't Go.

Tuesday, June 25, 2013

Jim Finishes My Pashmina Lift- West Sound, Orcas Island

Last year Jim and Patty from Orcas were cruising with me and Jim said he would work on several projects that I wanted done. It wasn't long that I received my galley extension table and slats to make an extra chart holder in the nav-station. While at Jarrals Cove, we measured and came up with a plan to make a lift to put Pashmina on the cabin roof top. While I have been out cruising Jim has been hard at work constructing the lift.

Finally the day has come, I motor from Blind Bay to Westsound County Dock where Jim meets me with all the parts at 0900 hrs. The weather is slightly drizzly off and on, but we hang in there for the whole day going back and forth from the dock to Jim's workshop a few miles away.

Day 2: I anchored in West Sound for the night and carefully picked my spot so that I would avoid the private mooring buoys. In the morning as I was weighing anchor I discovered that my line was caught on an anchor of a near by buoy. I worked and worked at all angles to free the snagged line, but no luck. I sat and sent a Reiki treatment to the situation. After the session I learned to put out more lack in the line and go forward in the direction of where my anchor was set. I then started to pull in the line and wow, it was free. I passed the snagged section and pulled in the anchor without a problem. Just like in life we get snagged on things, situations, the weight of them makes us feel as though we are dragging an anchor around or we have a large burden on our shoulders. Reiki goes in and removes the cause and then there is no tension in the line, we don't feel stuck and I certainly was relieved when the  line was free. Shatoosh was free to move about without restriction.

 I  practice getting Pashmina on and off. Jim makes some additional tweaks. I take time to clean Pashmina while we have use of the dock. It begins to rain, so I put her back in the water and head for the Orcas ferry Dock and buy a few things at the market, visit with an old friend and take off for Spencer Spit on Lopez Island.

County Dock West  Sound

Starboard Baseplate

Starboard cabin top bracket


Testing winch

Lifting bar attaches to seat  braces

Winch hook attaching to lifting ring


Up she goes

Temporary  fenders stabilize Pashmina 
Jim makes some final  adjustments


Thank you Jim and Patty for all the help, support and fabricating these special projects. I have used my galley extension and chart rack every day on this trip. I am going to have to practice with the lift more while Pashmina is on the dock before I even try to lift her out of the water. Jim, you are quite the craftsman and it was wonderful to get to see you in the process of making the final parts. It all came together so smoothly. Thanks a million.

Saturday, September 8, 2012

Overhead Chart Rack

One is always looking for extra space on a small boat and I have always thought about this small space created by the hardtop and the existing cockpit/helm area. Could this be used for charts, or Cruising guides?

Today another one of Jim's gifts was installed. I was able to get the first slat installed the other day, but quickly realized that I would need to make a line up jig for the slats and this would be a 2 person job. Care, one of my crew, came to Shatoosh to help me install the slats for my new overhead chart rack.

Thanks again Jim for pre-drilling the holes and sending me the slats. Lucky for me, he had a slat pile that were the exact length I needed left over in his shop. I used 10, but, if needed, I could add slats.


This T-bar helps separate the slats and keep them lined up
so we can drill the holes

The finished slats

The first chart book fits nicely.

The space is 1.5 inches deep and 33.5 inches long.

Thursday, September 6, 2012

Galley Extension

Remember my friends, Jim and Patti, from Orcas, Island, Washington. They were in the South Sound cruising on Fox's Secret and we rendezvoused at McMickin Island and Jarrell's Cove. Jim offered to make me several projects when he returned home. It didn't take him long as several packages arrived in the mail the other day and I have been finishing them in my garage.

I went to Shatoosh today to see how the galley extension would fit. Take a Look.


Make sure the tray clears height of mattress.


Fiddle size and shape can vary


Jim even supplied the piano hinge, the wood screws and the tray leg, which is a removable piece of teak placed between 2 wood blocks.


Wow, this turned out really nice. Thanks Jim, I really appreciate your generosity and your talent. Lets see what else we can make? I've got our list in my project book.

Saturday, September 1, 2012

Tweaking my Toothpaste

My buddy, Too Tall Tom, has sent me a link for RV-space saving and everything ideas, which are applicable to boats,as well.
www.andybaird.com
So in reading some of it, I thought about my toothpaste. Since I moved the toilet paper holder, it took up the space where the toothpaste lived. I wanted a new home for my toothpaste, so while this wasn't in the link, I came up with a new twist for its new home.

Folded over my towel rack and held in place with a large paper clip. This is now a one-handed twist on and off operation. I have to admit it is rather clever and refreshing.

Tuesday, July 3, 2012

Projects

I returned to Shatoosh yesterday afternoon as the new diesel mechanic was coming this morning at 0830 hrs. I had been trying to get an oil change scheduled in with another mechanic, however he seemed to function on some strange time schedule. After trying to deal with his, not compatible work ethic as mine, I gave up on him and grabbed the first opening with this other company. Boy, I am glad I switched. He was on time, organized, meticulous/clean and did a good job. Thanks Brian, out of Inlet Marine in Olympia. I will definitely use them again.

I put together my shelf in my storage locker and then was able to reorganize the area. It is always evolving, so it is in a trial period to see how I like the space. I can remove the shelf in an instant, if I have another idea.


After the mechanic left, I tackled installing the Hummingbird Depth Sounder and Fish Finder.
At this point, I was comparing readings, while I was at the dock with a minus tide, leaving  4 feet under me. I had placed the new transducer over the side in the location of the old one. Since I had never checked the old one for its accuracy, I tested the bottom with the boat hook and it was 5 feet. The old transducer is about a foot below the waterline.After prepping the inside hull area next to  the old sounder's thru hull fitting, I used  silicone on the transducer and got her set into place.


I will keep both up and running for a while. Right now I have the new one riding piggy back on the old one to save space. Everything went really well, however there was one glitch, that I am not happy about. While drilling the new holes for the routing of the 2 cables, oops, rolled off my tongue. I stared, stunned for a moment, as to what had happened. I was being very careful and working very close to another wire which is most dear to my heart. And that is my cable going from my usb adapter to my wiring for the gps/radar which controls the Sea Clear Nav Program.  Ho, um. the project list got a new item on it.

Saturday, June 30, 2012

Bruce Anchor and other projects

I decide to check out anchoring with my new Bruce, so we depart the marina and it is a flooding tide, no wind, waves or rain. I select that nice little bight where I saw the doe and her twin fawns at the creek  last week.  I dropped the anchor in 20 feet of water and backed Shatoosh to 7 feet of water, cleated off the rode and the anchor dug right in.
While having a covered slip is nice in the rainy northwest, it is nice to hang out on the hook and get some fresh air. I take this time to play around with placement of my gifted new fish finder and depth sounder.
This spot looks good.


This sounder will go to 600 feet while my old one that came with Shatoosh only goes to 100 feet. While I don't need a fish finder, it might show those harbor seals swimming by which throws the depths to 3 feet out of the blue and causes my heart to pound. I'm really only interested in the first 10-20 feet of water, but this one will show contours which can be useful. Thanks, Too Tall, for your gift.

The day is overcast, but what the heck, I weigh anchor and head to McMicken Island for the night. I can always find something to eat out of the tin section of the pantry. That is why my stores have such items, so I can have dinner on my numerous, spur of the moment,  trips. No one is on the water, I call the Viking Star to see where they are and find them in the next inlet-Carr at Penrose State Park. I round the north west point of McMiken Island and there are 3 big sailboats on the buoys, but the one on the east side is empty, so swing back around and pick up the buoy. I have never buoyed up on this side, so will see how I ride tonight. I open the side flaps and leave them open, as it is not cold today, however I still have long pants and shirt on. I close my eyes and just listen to the sounds; crows-cawing, eagles- screaming, kids- yelling, harbor seals-splashing, gentle waves- washing ashore and the busy wing flapping of the Pigeon Guillemots as they take off and land near Shatoosh.

It is high tide, a few sun breaks appear and I settle down reading a 41 year old letter Ann Gash hand wrote to my twin, Jean, while sailing her 24 ft Folkboat,  Ilimo 2, on her Hawaii leg to San Francisco. Starting  place was Sydney, Australia. I recently got a letter from an Australian author who is writing a book on Ann Gash, The Sailing Granny of Australia. I thought this letter might hold some interesting tid-bits for him and I was not disappointed. Decifering her handwriting is challenging, but one has to remember it is hard to have a steady hand on a bouncing boat in the middle of an ocean. I have already made a list of 10 stories that Jean and I remember and this will definitely sweeten the pot. Chris, if you are reading this, Smile. I have found a gold mine of info, that you will love.

I, also began to look how an extra shelf could be put in the port cockpit  locker. I took measurements and will see if I can build it.This will provide for better organization of all the things I have stored there. There is a lot of wasted space.

I  found some clam chowder for dinner. I don't know why they put so much salt in canned soups but it was too much for me, so the remainder went over board this morning and the Pigeon Guillemots loved it. It was a calm night once the 10PM winds stopped. There was a minus tide at 0830 this morning and the giant erratic rock stood watch over Shatoosh.


The rain and fog continued, so in spite of it, I turned on the radar, unhooked my buoy line(which I switched to the starboard side yesterday) and headed on a track-back course on my gps. It is 6nm and a straight shot home. I didn't bring my net-book yesterday, so am without my chart plotter. I'll see if I can remember how to get home without all that fancy gadgetry. As I move towards Johnson Point the fog gets thicker and this will be the area of any boat traffic. So I need to be alert.
The view from the helm.


As I approach the channel marker this 40 footer is closing in on my port headed south to Olympia and there is also another vessel, small, fast 27 fter speeding up on my starboard side and zooms in and around the channel marker, neither, never slowing down. I juggle Shatoosh to take on all the converging waves. I'm glad I was alert and ready for boat traffic.


What a nice 24 hours it was. I got lots of things accomplished, had a lovely time on the water and will make some new changes on Shatoosh.  There might be a weather break on Monday. See ya then.

Thursday, February 16, 2012

New LED Anchor Light

John Stokes of Ms Bettencourt in Georgia recently told me that I could now get an LED anchor light from a dealer that he uses in South Carolina. My anchor light is made by Aqua Signal and is the Series 25 type. The regular bulb is a festoon type that is double dimpled as opposed to the bullet connection. I had looked several years ago for a replacement but couldn't find one. I called the company to double check on the size and in a few days I had the light in my hot little hands.
marinebeam.com
44mm Festoon LED Navigational light Dimpled barrel end-item number FS-44-30B


Yesterday, I went to Shatoosh and in a matter of minutes the light was installed and working. This is wonderful, as the LED will hardly draw on my batteries ehrn anchored out and seems much brighter than the old one. Thanks John, you have made my day today, and probably for many dark nights to come.

On another note and rainy day project. I brought my old dirty life rings home and gave them a good scrubbing, took off the old lettering, as I was always unhappy with the spacing and setup of my lettering that I put on when I bought the new rings. After several trips to buy the correct letters and getting the old glue off the rings, I successfully reapplied them. I like this much better. Now I am happy with both Shatoosh lettering and my new Pashmina logo. We are ready for the boating season to begin.

Shatoosh's Swim Platform

Spring projects are appearing on many Albin lists. I have recently heard from some of my newly met,  female skippers here in Washington state. They are considering re-creating Shatoosh's Swim Platform. This has led me to gather photos, material information, receipts and to put together a packet of data and information. I am posting this so others may benefit from the information, as well.

In 2003, my friend Jo had her Albin 25, Lit'l Bit on the hard for the winter here in Tacoma, WA. She lives in  Hawaii on the Big Island, so I was going to keep my eye on Lit'l Bit for her and while doing so I decided to design a swim platform. This is a project that I have never done, so I was pushing my creativity envelope to the far reaches of my mind. I traipsed down to Lit'l Bit numerous times in the cold, wet Washington winter to take measurements, tracings and make numerous templates, which I still have and periodically send tracing of the form to other Albin owners.. When spring came, Jo flew over from the Big Island and together we cut the final platform and installed it. Jo no longer owns Lit'l Bit and the new owners have taken her to Alaska.
MDF Template glued to King Starboard

Cut and Still Connected

Newly cut and final sanding.
That is not snow on the ground but  rather shavings


 Meanwhile, Shatoosh was still in California and I was busy cruising the heck out of her. It wasn't until last summer 2011, that I finally got my swim platform installed. I love having it and now my new portaboat Pashmina 2 sits, proudly on it. I have had many compliments on her shape, design and I have to admit that I am totally pleased with my big design project. I have to thank Jo, as she is a master builder with decades of construction experience and to the Salmi Brothers at Warrenton Boatyard in Warrenton, Oregon(near Astoria, Oregon on the Skipanon River) for their superior installation.


Swim Platform for Albin 25
Thoughts to my friends regarding making a Swim Platform

Re: the templates( tracing, cardboard or MDF) and which one you might want depends:

1.     If you plan to create your own design and need only the shape of the transom, then a paper tracing should be all you need. My platform is 18 wide which gives one enough room to stand on and walk/sit without being offset by the upper transom rub rail. Remember that the transom is not at 90 degrees but slopes forward as you descend towards the water. Anything less than 18 inches is too narrow. I do not have the exact angle of the transom but maybe someone does.

2.     Deciding on materials. I did not want to deal with taking care of more wood which lead me to the starboard. If you were to decide on the starboard then I would want you to use the MDF template as it can be hot glued to the starboard and cut. King Starboard has a non-skid imprint into the surface. See website for info/planning/color selection. www.kingstarboard.com


The brackets I bought from West Marine did have an odd angle in them which is not stated in the catalog and I didn't realize until later. This did not match the angle of the transom so wedges had to be made of plastic and inserted between the bracket and the transom for the platform to be square.
Wedges placed to square off the brackets and platform
Jo and Lit'l Bit
You can see how the platform tilts when no wedges are used.


When installing the brackets it is critical to watch for placement. When you remove the aft cabin liner you will see that the air vents are fiberglassed all the way to the engine compartment which is a beautiful design. When we installed the duplicate platform on Jo’s Albin we could see where a previous platform had been attached and they had drilled into this vent system from the outside and then had to cut a hole into the vent to gain access to the bolt to attach the nut, which meant air was not going down to the engine compartment. Another owner had taken off the original platform, but never re-glassed the hole. It is always amazing what you find in boats with many owners.
Aft Cabin with Liner Removed
Fiberglassed Port Air Vent to Engine Compartment.


With the shape of my design the 2 smaller brackets fit nicely on the outer side of the vent and the 2 larger brackets fit inward of the vents.

Placement of brackets with air vent positions


Then you have to decide on the height placement, too high it looks unsightly and would make it difficult to get onboard if swimming or falling over board, so I placed mine above the lower teak step. I did leave the step SS thru bolts, but took the teak step off the bolts(holders) as I did not want to reglass the holes on the transom. That’s another project. Make sure that you have SS back up plates for the bracket thru bolts. We used SS bolts but one is already rusting. Also, leave room between the platform and the transom for water to drain which is where the wedges/brackets help.

The Finished Product
Very Nice 
Good placement with Air vents

Beautiful  lines on the water


Swim Platform Materials 2003 prices                                                                             Makes 2 full transom Swim Platform


 See www.kingstarboard.com to see all options for ordering/colors/tools needed to cut materials.

     King Starboard purchased from: Interstate Plastics Attn Byron
w  www.interstateplastics.com
6846 So 244th St
Kent Wa 98032
800-742-3444

1 sheet of King Starboard: white in color-- 1in X 54in X 96in. Weighs 180#, Cost: $458

Pre cut at factory into (2) 27in x 66in pieces (these 2 pieces made full platforms for Shatoosh and Lit’l Bit. 
With the left over material we then cut:
(2) 27in x 30in pieces (these 2 pieces went to John Elmore(Too Tall Tom) for his Skol split transom swim step.) Skol has been bought and now lives in Seattle on Lake Union and is being restored beautifully by his new owner, Corey.


2.     Design layout: Concave-Convex Shape
Widest length:64 in
Widest width: 25 ¼ in
Width of platform: 18 in

1.     MDF BOARD ½ in X 4ft x 8ft Home Depot cost $14.72

MDF Template Glued To King Starboard


2.     Stainless Steel Brackets Made by AFI but bought at West Marine
Each platform requires 2 - 7 in brackets and 2- 9 in brackets
4- 60995- 9in x 17 x 1 ½ -- 54.99 ea
4- 60993- 7 in x 14 x 1 ½ -- 42.49 ea
Total: $ 424.24

3.     SS bolts/washers/nut/backup plates not included in costs.

4.     King Starboard- $458
MDF Board-$15
+Brackets- $424
Total- $898   divided by 2 = Each Platform cost $ 449 

I  apologize  for the errors in numbering and misplaced words/letters. Since I cut and pasted from another file I haven't been able to see them on the editing section of the blog to make corrections. This is one of those times where the blog is in not forgiving of an inserted strange format.

I hope this information is helpful to all you Albin 25 owners who want to make their own swim platform.

Saturday, November 26, 2011

Tweaking Pashmina 2's Impresa

I continue to play around with my impresa for Pashmina 2, to fine tune the elements. I sit quietly with a new, clean sheet of paper, close my eyes and open myself  for universal assistance. There needs to be clearer lines and something is missing.

It doesn't take long to capture the missing piece to the design. and to fine tune the images. While I have scanned the image, the colors are not accurate. This can all be fixed in the professional design process when the graphic is made.


Again, the elements are:

1. The waxing crescent moon brings light onto new adventures for us.
2. The orb(circle) holds the focal point of the energy of our journey as we travel through zillions of water droplets in the magical Salish Sea. We are all part of this Circle of Life.
3. Pashmina 2 offers new freedom for me to explore and the eagle represents this.
4. I needed a boat that is tough as nails and won't destruct on rough beaches...and the eagles talons are strong as nails.
5. The rings represent the great cedars and firs that we will encounter.
6. The salmon make their way from the small creeks and rivers to the ocean and return again to create new life. Pashmina 2 will carry me back and forth from sea to rivers and I will always emerge renewed, refreshed, and ready for another adventure.
7. The beautiful sand dollars that grace my favorite Island in the Sound, represent the delicate aquatic forms of life that fascinate us and create an unbelievable underwater ecosystem.

I sit back, knowing the impresa is complete. This design truly supports our exploration of the Salish Sea and know Pashmina 2 will be happy to have this grace her hull.